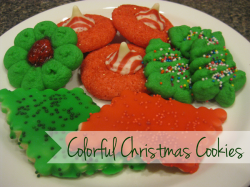
Colorful Christmas Cookies

Fun Christmas Cookie Recipes
Looking to add some color to your Christmas cookie tray this year? Try one (or all) of these recipes!
I've included a few ways that I change up the traditional spritz recipe, plus a fun peppermint blossom and some soft, cream cheese cookies. All of them incorporate a lot of color to add some brightness to your holiday!

Christmas Tree & Wreath Spritz

I adore these cookies, and they are so simple to make! The cherry adds a nice accent to the cookies, and also helps keep them very moist. You should store them between sheets of parchment or waxed paper, to protect the cherries. You could add green sugar sprinkles for more texture, but I think the cherry adds enough sweetness.
I use a disc in my cookie press that is a circle made up of tiny circles with one circle in the middle. The only thing to be careful of is making the cookies too small. If not enough dough comes out of the press, and the circles of dough aren't touching, they may fall apart after baking. This is because of the extra moisture of the cherries. Just give your press a little extra push, if need be, to be sure there is a full cookie, not just a bunch of stand-alone dough dots.

These fun, colorful gems are really my favorites. Everyone recognizes them as Christmas trees and yet they're so simple and elegant. If you can find some giant star-shaped sprinkles, you could add them to the tops of the trees, but I don't think it's necessary.
The pure flavor of a good-quality butter, the sparkling colors of the simple sprinkles, and the playful, easily recognizable shape, all make these a perfectly delightful Christmas cookie choice!

For the wreath cookies, you need to cut maraschino cherries in half to add to the tops. I like to do this before I start the batter. I also try to cut them in half so that my knife goes through where the pit came out, so I don't end up with one half that has a big hole in it.
Sometimes I mix my vanilla into my egg, which I like to break before adding into a batter, and you can see that in the top right photo.
I added the food coloring to the wet ingredients, after they were mixed. I used liquid food coloring this time, but have also used gel food coloring in the past. The flour will lighten the color a little, so make it slightly darker than you'd like the finished product to be.


Ingredients
- 1 Cup Softened Butter
- 1 Cup Sugar
- 1 Large Egg
- 1 Teaspoon Vanilla Extract
- 2 1/3 Cup Flour
- 1/2 Teaspoon Baking Powder
- 1/4 Teaspoon Salt
- Green Food Coloring
- Nonpareil Sprinkles or Halved Maraschino Cherries
Instructions
- Cream together butter and sugar. Blend in egg and vanilla. Mix in food coloring until slightly darker than desired color.
- Combine flour, baking soda, and salt in a small bowl. Add to sugar mixture.
- Put dough in cookie press. Press onto ungreased cookie sheet. Sprinkle nonpareils on tree-shaped cookies and place half a cherry on center of wreath-shaped cookies. Gently shake any extra sprinkles off of cookie sheet before baking.
- Bake at 375°F (190°C) for 7 to 9 minutes.
- Makes 6 dozen.
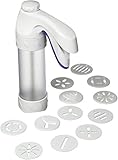
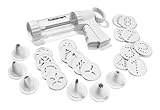
Cookie Presses - You'll need one to make the Spritz cookies. Before purchasing one, make sure it has discs for the cookie shapes you want!


Chocolate Almond Spritz

Technically, this is a recipe you could put in a cookie press, but I so love making them shaped like little, chocolate truffles! This allows the center to stay quite moist, and so resemble candy in that aspect as well, but with that filling bite of a cookie.
They would also look spectacular with nonpareils in only red, green and white, but I like the playfulness of all the colors, too.
The almond flavor is a spectacular accent to the flavor or the cocoa. They'll be a unique accent to your cookie array for Christmas, especially with that fun burst of color at the top, but are great for parties any time of the year!

The photos above show before and after of the blending of both the wet and dry ingredients. You want to be sure the cocoa is fully mixed into the flour before adding it to the wet mixture.
The decoration on top is really easy to achieve. I pour some nonpareils in a small dish, shape the dough into small circles (about a teaspoon full), and press the top of the circle into the dish of sprinkles. Then place them on the cookie sheet, sprinkle side up to bake.


Chocolate Almond Spritz - Printable Recipe
- 1/2 Cup Sugar
- 3/4 Cup Softened Butter
- 1 Egg Yolk
- 1 Teaspoon Almond Extract
- 1 1/2 Cups Flour
- 1/4 Cup Unsweetened Cocoa Powder
Instructions
- Combine the sugar, butter, egg yolk and almond extract until creamy.
- In a small bowl, whisk together the flour and cocoa powder. Gradually add it into the sugar mixture.
- Shape teaspoonfuls of dough into balls and dip into a dish filled with nonpareils or other decoration.
- Bake at 375°F (190°C) for 7 to 9 minutes. Do not overcook. Makes 3 dozen.
Candy Cane Blossoms

I've made the Peanut Butter Blossoms plenty of times, but when I saw these Candy Cane Kisses, I just knew I had to try some Candy Cane Blossoms! I found a recipe on the Hershey's website.
I love mint, I love chocolate, and I love cookies, so it seemed like a great choice.
I loved the soft cookies, with the slight crunch of the sugar sprinkle crust, but I did make sure to add mint to the batter, as I didn't just want minty kisses sitting on top of plain sugar cookies. And I used only red sugar sprinkles because I love the striking look of the red and white, and found the green sprinkles detracted from that. For an extra punch of red, I also added food coloring to the batter.
Because I left mine on a pan a little too long, the kisses melted a bit, which was okay by me. I like the look of the flattened kisses, and actually considered putting the cookies back in the oven after pressing the candy into the tops of them, so that they would more closely resemble thumbprint cookies. Maybe next year.

Rolling balls of dough in sprinkles is something that my toddler loves to help out with! I find that the sprinkles give the outside of the cookie a nice texture, and a slight crunch of sugar in every bite.
An easy way to get the sprinkle coverage is to pour a good amount into a small dish and roll the dough in it, making sure each side touches. The sprinkles help the dough not stick to cookie sheets, so the parchment paper is really unnecessary, but I like to use it anyway. Just in case I missed a few spots.


Candy Cane Blossoms - Printable Recipe
- 1/2 Cup Softened Butter
- 1 Cup Sugar
- 1 Large Egg
- 1 1/2 Teaspoons Mint Extract
- 10 to 20 Drops Red Liquid Food Coloring
- 2 Cups AP Flour
- 1/4 Teaspoon Baking Soda
- 1/4 Teaspoon Salt
- 2 Tablespoons Milk
- Red Sugar Sprinkles
- 40 to 50 Unwrapped Hershey's Candy Cane Kisses
Instructions
- Beat butter, sugar, egg, mint extract and food coloring. In a separate bowl, combine flour, baking soda and salt. Alternately add the flour mixture and the milk to the sugar mixture, blending well after each addition.
- Shape teaspoonfuls of dough into balls. Roll balls in the sugar sprinkles until fully covered. Place on ungreased cookie sheet 2 inches apart.
- Bake at 350°F (175°C) for 8 to 10 minutes, or until cookie is set. Let sit for about two minutes, then gently press a candy kiss into the top of each cookie. Remove cookie to wire rack to cool completely.
Iced Cream Cheese Cookies

I knew that I wanted to dip some cookies in red and green icing for a smooth finish, but to go with something a little unexpected, I used a cream cheese cookie instead of the sugar cookie that's more traditional at Christmastime.
The cookie is soft and delicious, and the icing is bright with a crisp top that breaks apart into pleasant gooeyness while eaten.
The photo above, unfortunately, doesn't show the cookies at their best. I realized I'd forgotten for photograph them alone and this photo was taken after I'd pulled them out of the fridge after returning from five days spent out of town. They still tasted great, but I guess the refrigerator doesn't do much for the consistency of the icing. Luckily, they don't have to be refrigerated, but will keep fresh much longer if you have the need.

The powdered sugar in the recipe produces a dough that resembles a thick cupcake icing. Yum ... can you just imagine: cookie dough icing!
You do have to refrigerate the dough so that it will be firm enough to roll and cut into shapes. Mine spent most of the day in the fridge while I made other cookies and ran around after my two kids.

I wanted something that would stand out on my cookie trays, and not look like any other shapes I'd already made, so I went with a rectangle cookie cutter that had a crinkle edge.

I wanted full coverage of the cookie top, so I decided to dip them in the icing. I suppose you could pour the icing over the cookie, something I've done with small cakes, but I went with this. It was fairly quick.
I did have to gently shake or tap the cookies to get off any large amounts of excess, though, because it puddled around the edges if I forgot.
Just after icing the cookie, I sprinkled red nonpareils on the red icing and green nonpareils on the green icing. I did the red first, and then the green after the red dried (which doesn't take terribly long) so that I wouldn't end up with lots of wayward green sprinkles on my red cookies, or vice versa.
Oh, and I ran out of parchment paper. So I added plastic wrap to my tin foil just to make double sure nothing stuck to anything as the icing dried.

Iced Cream Cheese Cookies - Printable Recipe
- 1/2 Cup Softened Butter
- 1 (3 ounce) Package Softened Cream Cheese
- 1 Cup Powdered (Confectioners) Sugar
- 1/2 Teaspoon Baking Powder
- 1/2 Teaspoon Salt
- 1 Large Egg
- 1 1/2 Teaspoons Vanilla
- 2 1/4 Cup AP Flour
- Icing Ingredients:
- 2 Cups Sifted Powdered Sugar
- 4 Teaspoons Milk
- 4 Teaspoons Light Corn Syrup
- Red and Green Food Coloring
- Red and Green Nonpareil Sprinkles
Instructions
- Blend together butter and cream cheese. Continue beating with an electric mixer on medium to high for 30 seconds.
- Add the powdered sugar, baking powder and salt until well combined. Then beat in the egg and vanilla. Finally, slowly add the flour until incorporated. If the mixer can’t get it all, finish stirring it in by hand.
- Wrap the dough in plastic wrap and chill in the refrigerator for at least an hour, or overnight.
- On a lightly floured surface, roll dough to 1/4 inch thickness. Use cookie cutters to cut into desired shapes, and place on ungreased cookie sheets, preferably lined with parchment paper.
- Bake at 375°F (190°C) for 8 or 9 minutes, or until the edges just barely begin to brown. Transfer to a wire rack to cool.
- For cookie icing: mix together all ingredients, adding a little extra milk if it’s too thick. Divide into two bowls. Dye one bowl of icing red and the other green, slowly adding food coloring until you reach your desired shade.
- Dip cooled cookies in icing, tapping or shaking gently to allow excess to drip back into bowl. Set on parchment or waxed paper and sprinkle with matching nonpareil sprinkles. Let icing harden. Store covered, separated by sheets of parchment or waxed paper.