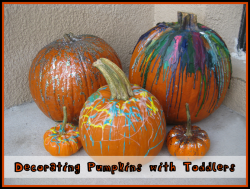
Decorating Pumpkins with Toddlers

Fun Pumpkin Projects for Little Hands
I want Halloween to be fun for my two-year-old, not scary, and certainly not dangerous. So I decided it was a bad idea to bring out the carving knives around my toddler, and her 7-month-old sister, who both insist on being intrinsically involved in everything I do.
Instead, we brought out the glitter, the puffy paint, and the crayons, and we made a mess of the garage floor, while having a great deal of fun. My daughter loved the pumpkins so much, that we couldn't even keep them on display outside - we had to bring them in so she could see them all the time!

These could use some glitter ...

Glitter Pumpkins

This was probably my favorite, and not just because it was super simple. I guess it's because I like sparkly things!
Simply take a bottle of white glue, drizzle plenty of it all over the pumpkin, and then shake glitter over the wet glue. Make sure you use lots of glitter, because the glue dries clear.
You can see in the photo that there's an empty space on the pumpkin without much glitter. That was caused by the curious toddler touching the not-quite-dry glue, so make sure they dry completely before you let the kids explore the sparkle!
Glitter! - And plenty of colors to choose from!

Glow-in-the-Dark Pumpkins

This was also quite easy. I purchased white, glow-in-the-dark paint, and let my daughter pick out a couple other colors of regular puffy paint. She picked out yellow and teal.
We drizzled all three paints all over the pumpkins (she also drew in it with her fingers) and let the paint dry. Then turn out the lights to see your pumpkins glow!
Painting the Pumpkins

Glow-in-the-Dark and Neon Paint Set

Melted Crayon Pumpkin

This pumpkin project was a little bit more involved. My daughter wasn't very interested in melting the crayons herself, either, she just liked watching me melt them.
I started by peeling the paper off a handful of crayons and breaking them into two or three pieces. Those pieces were hot glued to the top of the pumpkin, around the stem. Then we placed it on newspaper in the garage and plugged my hair dryer into a extension cord.
The hair dryer is the heating element that will melt the crayons. Mine took a few minutes to really warm up enough to melt them. And some melted quicker than others, because I used about three different brands of crayons. Don't know which was which, though.
You have to be cautious, however, because the hair dryer causes the crayons to splatter tiny bits of hot wax as they're melting. My daughter sat a couple feet away and was fine. I let her hold the hair dryer in the beginning, but it was too heavy for her, so she just watched the melting and melding of all the colors, while I held the hair dryer. Once the hair dryer warmed up, the crayons melted within a few minutes.
It was a really neat effect, and my daughter especially enjoyed breaking off tiny pieces of the dried melted crayons that hung off the sides of the pumpkin. In the future, I might just use black and maybe purple crayons for a more Halloween-y effect. And I'd do it closer to Halloween, since the heat of the dryer compromised the integrity of the pumpkin.
Done!


